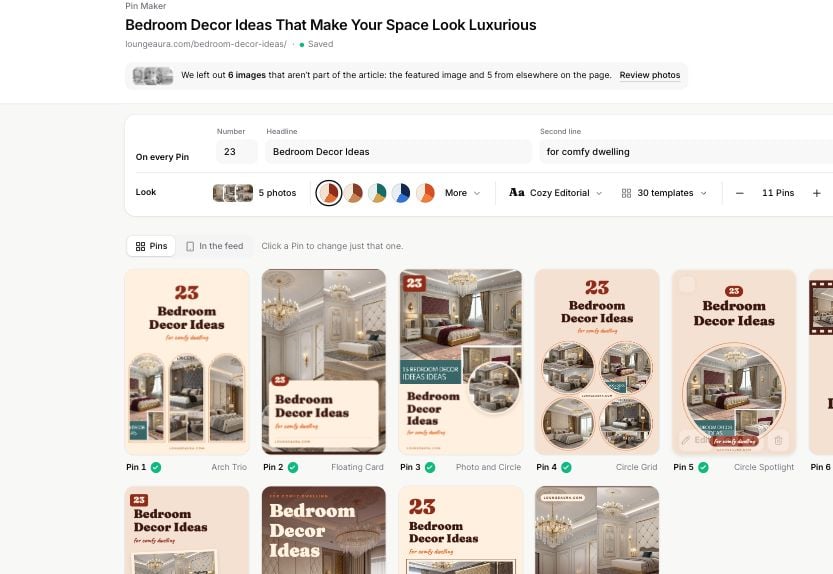
Pin Maker turns images from your blog into a varied set of Pinterest pin designs. Use it when you want to create pins for one article, prepare pins for several posts at once, or build pins from images on your device. You can choose the images, colors, fonts, and wording before downloading the designs as PNG files. Open Create in the Pinsearch sidebar, then select Pin Maker.
Pin Maker requires active Pinsearch access through a free trial, subscription, or lifetime license. Creating and downloading pins does not use AI creation credits.

Create pins from one blog post

1

Import your blog post

Keep Single URL selected. Paste the public URL of your blog post, then click Import.Pin Maker reads the page title, description, website address, and available images. Your first pin set appears automatically after the import finishes.
2

Review the Image Pool

Pin Maker includes the usable images it found on the page.
  • Click a checked image to exclude it from the pin set. Click it again to include it.
  • Click the star on an image to make it a priority. Priority images are used more often.
  • Click + Upload to add your own JPG, PNG, or WebP images.
  • Click Show all images when the page contains more images than the first group shown.
Keep at least one image included so Pin Maker can build a pin set.
Pin Maker showing imported recipe images beside eleven generated Pinterest pin previews

Pin Maker imports blog images and immediately creates a varied set of pin previews.

3

Choose the size and style of the pin set

Expand Pin Sets to control the whole set.Under Pins per page, choose 5, 11, 20, or enter a custom number up to 30. Pin Maker uses smart rotation to vary the images and layouts instead of repeating one design.Under Brand Style, choose a Color Palette and Fonts. Click View all when you want to see every available choice.
Pin Maker Pin Sets section with pin count choices, color palettes, font styles, and generated previews

Pin Sets applies one pin count, color palette, and font system to the current set.

4

Edit the words on your pins

Expand Pin Copy, then review these fields:
  • Number: An optional number for list-style pins, such as 17.
  • Pin title: The main headline shown on the designs.
  • Accent text: An optional short phrase used by some layouts as a badge or script-style detail.
  • Footer / website: Your website name. Pin Maker fills this from the imported URL when possible.
Your previews update as you type. Keep the title and accent text short enough to read quickly on a phone.
5

Review and customize the previews

Click a preview to enlarge it. Click Customize to choose where the title sits for that template, such as Auto, Top, Center, or Bottom.Use the check in the corner of each preview to select the pins you want to download.
6

Download your pins

Click Download selected to download only the checked designs, or click Download all to download the complete set.Pin Maker downloads a ZIP file containing PNG images that are ready for your Pinterest workflow.
Download the pins you want before refreshing or leaving Pin Maker. Pin sets are not saved in the Article Library.

Create pins from images on your device

You can use Pin Maker even when you do not have a blog post ready. Under Single URL, click Upload images manually instead. Choose one or more JPG, PNG, or WebP images, then use Pin Sets, Pin Copy, and the preview controls in the same way as an imported post. The title, accent text, number, and footer start as editable fields because there is no page for Pin Maker to read.

Create pins for several posts

Use Bulk Generate when you want to prepare pin sets for more than one article from the same website.
1

Find your blog posts

Select Bulk Generate, enter your website address, then click Find Posts.Pin Maker checks the website sitemap and lists the posts it can find. Use the search box to narrow the list by title or URL.
Pin Maker Bulk Generate view showing a website, searchable post list, selected post, and import button

Bulk Generate can find posts from a website sitemap before you choose which pages to import.

2

Choose up to 10 posts

Select the posts you want, then click Import Selected Posts. Pin Maker can import up to 10 posts in one batch.If sitemap search does not show the pages you need, click Copy/paste bulk URLs manually. Paste one article URL per line, then click Import URLs.
3

Review each page

Select an imported page to see its pin previews. Use change images when you want to include, exclude, prioritize, or upload images for that page.Pin Copy changes the currently selected page. Pin Sets applies the pin count, palette, and fonts across the bulk run.
4

Download the batch

Check individual previews and click Download selected when you only need pins from the current page. Click Download all to download every generated pin from every imported page in one ZIP file.
Pin Maker plans a varied set for you automatically:
  • It favors clearer, larger images and skips images you exclude.
  • It uses starred priority images more often without placing them on every pin.
  • It rotates layouts, image combinations, and text positions to reduce repetition.
  • It may create fewer pins than requested when there are not enough usable images or unique layout combinations.
Give Pin Maker several clear images with different subjects or angles. A more varied Image Pool usually produces a stronger, less repetitive pin set.

Troubleshooting

Make sure the blog post is public and opens without a login. Try the direct article URL instead of a category or homepage. You can also click Upload images manually instead and add JPG, PNG, or WebP files from your device.
The current Image Pool may not support enough unique designs. Include more usable images, upload additional images, or choose a smaller number under Pins per page.
Remove its priority star, exclude duplicate versions, or mark other strong images as priority. Pin Maker rebuilds the mix as you change the Image Pool.
Click the check in the corner of at least one pin preview. The button becomes available after a pin is selected.
Click Copy/paste bulk URLs manually, paste the direct article URLs one per line, and click Import URLs. You can import up to 10 URLs in one batch.