> ## Documentation Index
> Fetch the complete documentation index at: https://docs.pinsearch.co/llms.txt
> Use this file to discover all available pages before exploring further.
# Send an article to WordPress
> Send a Pinsearch article draft to a connected WordPress site as a draft or published post.
Use **Send to WordPress** when your article is ready and you want Pinsearch to create or update a WordPress post for you.
This is helpful when you want less copy-paste work and a faster path from research to publishing.
 ## Before you start
Make sure:
* Your WordPress site is connected in **Settings**.
* The article title and body are ready.
* A featured image is selected.
* Images have useful alt text.
* SEO fields are filled in if you plan to use them.
* You saved your latest edits.
## Choose a WordPress site
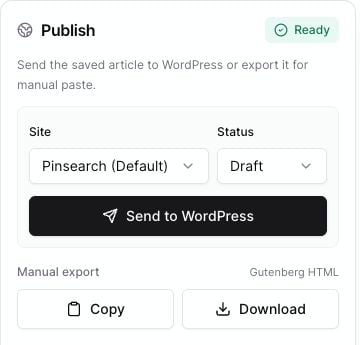
In the **Publish** panel, use **Site** to choose the connected WordPress site.
If you only have one connected site, Pinsearch selects it automatically. If you have a default site, it appears as the default destination.
If no site is connected, the panel shows **No site** and **Send to WordPress** is disabled.
## Choose draft or publish
Use **Status** to choose how WordPress should receive the article.
## Before you start
Make sure:
* Your WordPress site is connected in **Settings**.
* The article title and body are ready.
* A featured image is selected.
* Images have useful alt text.
* SEO fields are filled in if you plan to use them.
* You saved your latest edits.
## Choose a WordPress site
In the **Publish** panel, use **Site** to choose the connected WordPress site.
If you only have one connected site, Pinsearch selects it automatically. If you have a default site, it appears as the default destination.
If no site is connected, the panel shows **No site** and **Send to WordPress** is disabled.
## Choose draft or publish
Use **Status** to choose how WordPress should receive the article.
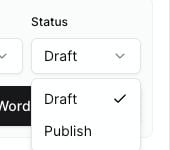 * **Draft:** Creates or updates the post as a WordPress draft.
* **Publish:** Sends the post as a published WordPress post.
Choose **Publish** only when you are ready for the post to go live on your WordPress site.
## Send the article
Go to **Create**, open **Library**, and click **View** beside the article.
Check the title, body, images, and SEO fields.
In the **Publish** panel, choose the **Site** and **Status**.
Click **Send to WordPress**.
If the article has unsaved changes, Pinsearch saves the latest version before sending it.
## After the article is sent
When publishing succeeds, Pinsearch shows a success message.
If WordPress returns a post link, the editor shows **View WordPress post** so you can open the post in WordPress.
If the article was already sent to the same connected WordPress site before, Pinsearch updates that existing post. If not, it creates a new WordPress post.
## Related guides
* [Prepare an article for publishing](/pinsearch-product-guides/article-editor-and-publishing/prepare-an-article-for-publishing)
* [Fix WordPress publishing warnings](/pinsearch-product-guides/article-editor-and-publishing/fix-wordpress-publishing-warnings)
* [Troubleshoot WordPress publishing failures](/pinsearch-product-guides/article-editor-and-publishing/troubleshoot-wordpress-publishing-failures)
* [Export an article for manual WordPress publishing](/pinsearch-product-guides/article-editor-and-publishing/export-an-article-for-manual-wordpress-publishing)
* **Draft:** Creates or updates the post as a WordPress draft.
* **Publish:** Sends the post as a published WordPress post.
Choose **Publish** only when you are ready for the post to go live on your WordPress site.
## Send the article
Go to **Create**, open **Library**, and click **View** beside the article.
Check the title, body, images, and SEO fields.
In the **Publish** panel, choose the **Site** and **Status**.
Click **Send to WordPress**.
If the article has unsaved changes, Pinsearch saves the latest version before sending it.
## After the article is sent
When publishing succeeds, Pinsearch shows a success message.
If WordPress returns a post link, the editor shows **View WordPress post** so you can open the post in WordPress.
If the article was already sent to the same connected WordPress site before, Pinsearch updates that existing post. If not, it creates a new WordPress post.
## Related guides
* [Prepare an article for publishing](/pinsearch-product-guides/article-editor-and-publishing/prepare-an-article-for-publishing)
* [Fix WordPress publishing warnings](/pinsearch-product-guides/article-editor-and-publishing/fix-wordpress-publishing-warnings)
* [Troubleshoot WordPress publishing failures](/pinsearch-product-guides/article-editor-and-publishing/troubleshoot-wordpress-publishing-failures)
* [Export an article for manual WordPress publishing](/pinsearch-product-guides/article-editor-and-publishing/export-an-article-for-manual-wordpress-publishing)